What would you like to know?
When looking to create a beautiful piece of art for your walls, a mounted canvas is a perfect solution, but one must be sure their files are going to give them the result they want.
Your images (files) need to be as large as the front of the mounted canvas as well as the sides, and your images should continue down the sides (bleed margin).
People submitting files with white space for the sides of the canvas (no bleeds) risk having white lines on the front of their canvas, because canvas’ are mounted by hand and definitely have a margin of error of +-1cm.
Below are 2 examples of a 24″ x 24″ mounted canvas’.
– The file requirements for a 24″ x 24″ with 1″ frame is a 26″ x 26″ file
the bleed needs to be 1″ on all four sides to cover the edges of the frame
– The file requirements for a 24″ x 24″ with 2″ frame is a 28″ x 28″ file
the bleed needs to be 2″ on all four sides to cover the edges of the frame
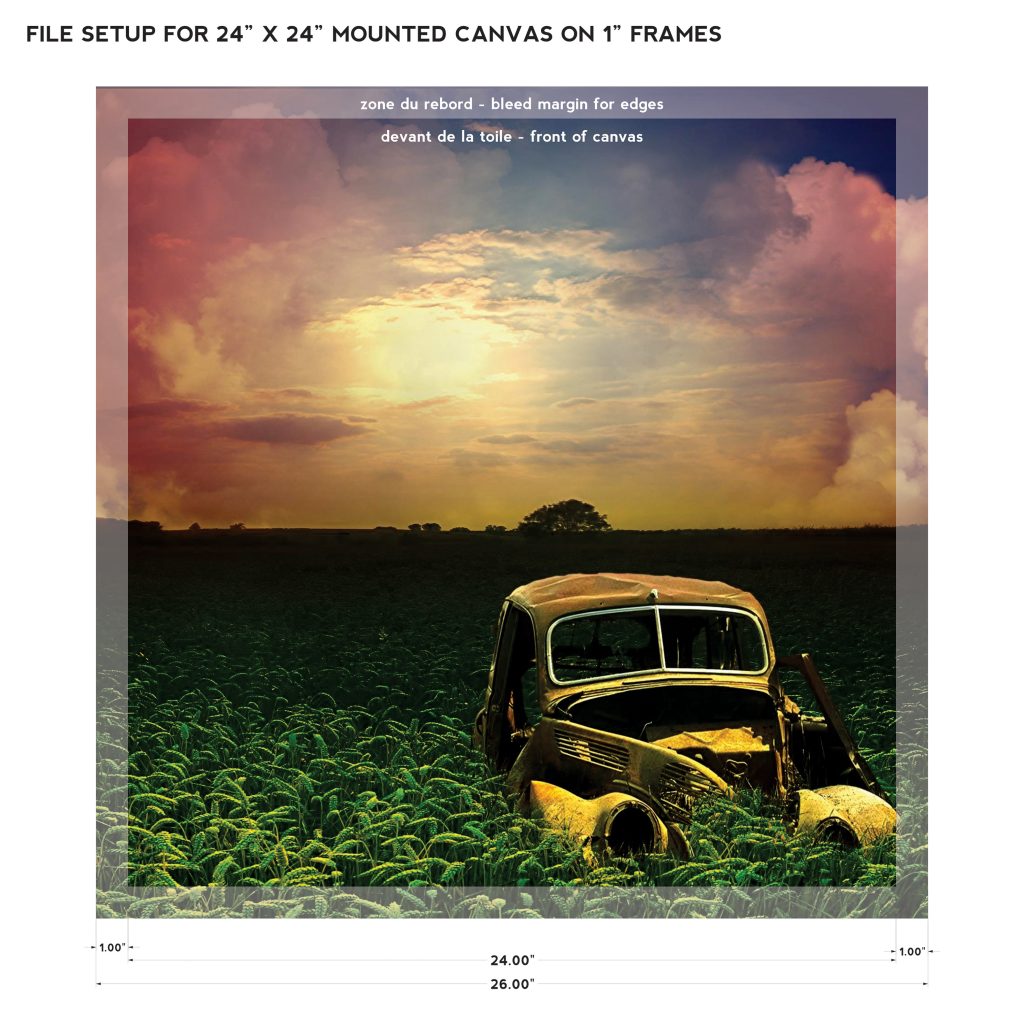
The photo used in this example works well for a 1″ frame, because the car sits nicely in the lower left hand corner
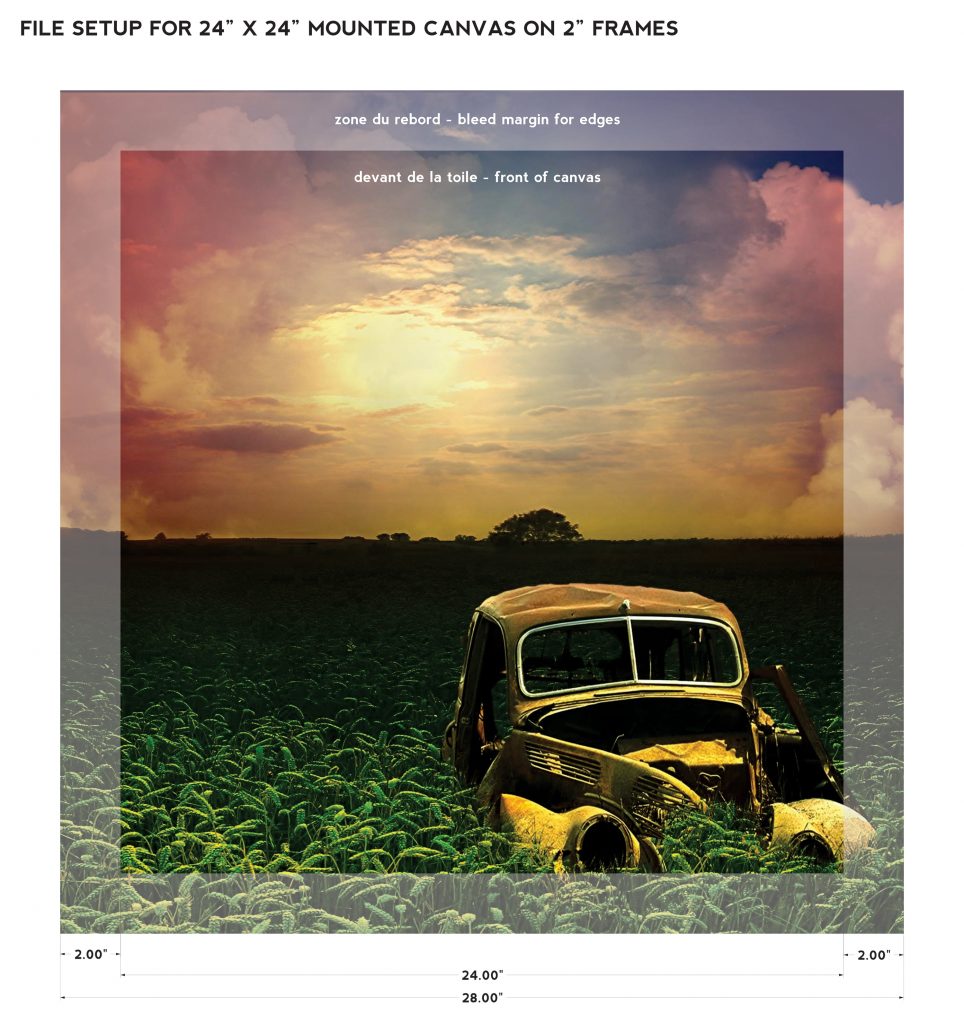
The same photo however does not work well on a 2″ frame, as the edge of the car ends up going down the side of the canvas frame
Taking time to setup your files properly can help you get the most out of your art!
Perfect book binding is a glue binding that looks just like a soft cover book. One needs to think a little differently when creating a book, and some things that might not seem so obvious can cause big problems when it comes to a finished piece.
Let us help you through these three steps to accomplishing a good looking book (content aside)!
- Choosing the paper
- Setting up the cover and spine
- Setting up the interior pages
1. Choosing Your Paper
Rubiks can perfect bind books with many types of paper and even card stock, however, it is important to note that there is a minimum amounts of sheets that are needed to produce a book, otherwise the glue will not hold and the book will fall apart. The minimum amount of sheets depends on the thickness (or weight) of the paper type.
Minimums for our most common paper types:
- 20lb Enviro (our thinnest paper) = minimum of 25 sheets
- 140m Lynx Laser Paper (thicker, standard matte book paper)= 20 sheets
We can bind books with coated paper interiors (gloss, etc.) but this does decrease the solidity of the book. We cannot be held responsible for pages that come loose on books with coated interiors.
2. Setting Up Your Cover
Rubiks will charge an extra fee (minimum 25$) for setting up the cover of your book, so it’s good to learn how to do it properly yourself. There are certain steps to take and certain ways to setup your document.
We also strongly recommend taking your covers with matte lamination, as this provides a good protection against scratches, fingerprints and tearing for your cover
Requirements:
- Your cover must be a separate file (document) from the rest of your book. A high resolution pdf is preferred.
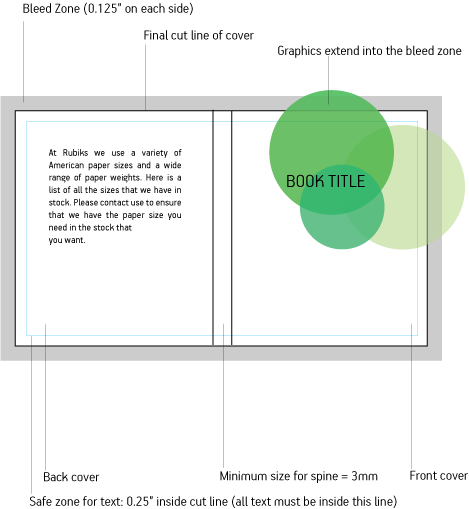
- You must include the back cover, spine and front cover as one image in your document (see diagram below)
- You must add bleed to your cover (0.125″ on each side) See our Bleed Guidelines (link) if you need help with bleeds.
- It is strongly advised that your spine be of the same background colours as you front and back covers. When creating a spine that is a different colour, then the print shift tolerance of +/- 2mm can be noticed much easier.
Steps to Take:
- Choose the paper type for the inside pages of your booklet when requesting your quote
- Verify the spine thickness number indicated in the quote you receive.
- Add this measurement to the widths of your front and back cover.(For example, if your book is 8.5″ x 11″ and your spine width is 0.25″ thick you would add 8.5+8.5+0.25 to get a total width of 17.25″. You now know that your total cover size is 17.25″ x 11″
- Add 0.125″ bleed to each side of the total cover size to get your document size(For example if your cover is 17.25″ x 11″, with bleed it should be 17.5″ x 11.25″)
- Create a new document in the program of your choice with this size
- Paste in or create the graphics for your back cover, spine and front cover, making sure to let the background colors and graphics extend to the edge of the document. Also make sure to keep your text within the safe zone. (See diagram)
- Save your document as a .pdf (see ‘Saving files for printing’) link***
- Repeat the above steps for the inside of your cover if you require printing on the inside cover. Please note, this is not advised, and very rare do books actually have printing on the side of their front and back covers. They are more often than not just blank
3. Setting Up the Interior Pages
First, make sure the file for your interior pages should starts as the first page of the reading section, NOT including any of the cover pages (interior or exterior)
Note the first page will be on the front of a sheet. Page numbers that fall on the front of a sheet are always ODD numbers and backs of the pages are always EVEN numbers. (page 1 is a front, 2 is a back, which would be on the left side next to page three, which is on the right). When you open a book, and view both the left and right side as one page, this is referred to as a spread. Spreads must be comprised of an EVEN (left and ODD (right) page. For example, if you had a photo that took 2 pages and those 2 pages were page 7 and 8 in your PDF document, this spread would not work as it would land on a front and back of the same page.
Include a gutter margin
When you hold a book open, the area where the book is glued together in the center is referred to as the gutter. You do not want any text to be too close to this area as it will be hard to read and force the reader to put unnecessary pressure on the spine by holding it open too wide.
For 6” x 9” book or smaller:
- 0.5” for top, bottom and outside margins
- 0.75” for gutter margins
For 8” x 10” or larger:
- 0.75” for top, bottom and outside margins
- 1” for gutter margins

Make sure your page numbers are on the outside
If adding page numbers be sure to put them on the outsides of pages. For example, ODD pages would have numbers on the far right, and EVEN pages would have them on the far left.
Make sure colour pages are in colour mode and black pages are in black mode
Pages that have colour on them need to be saved in CMYK and black or text only pages should be saved in just K (black of CMYK) This will reduce your costs by allowing us to print non colour pages in black only.
Make spreads look good
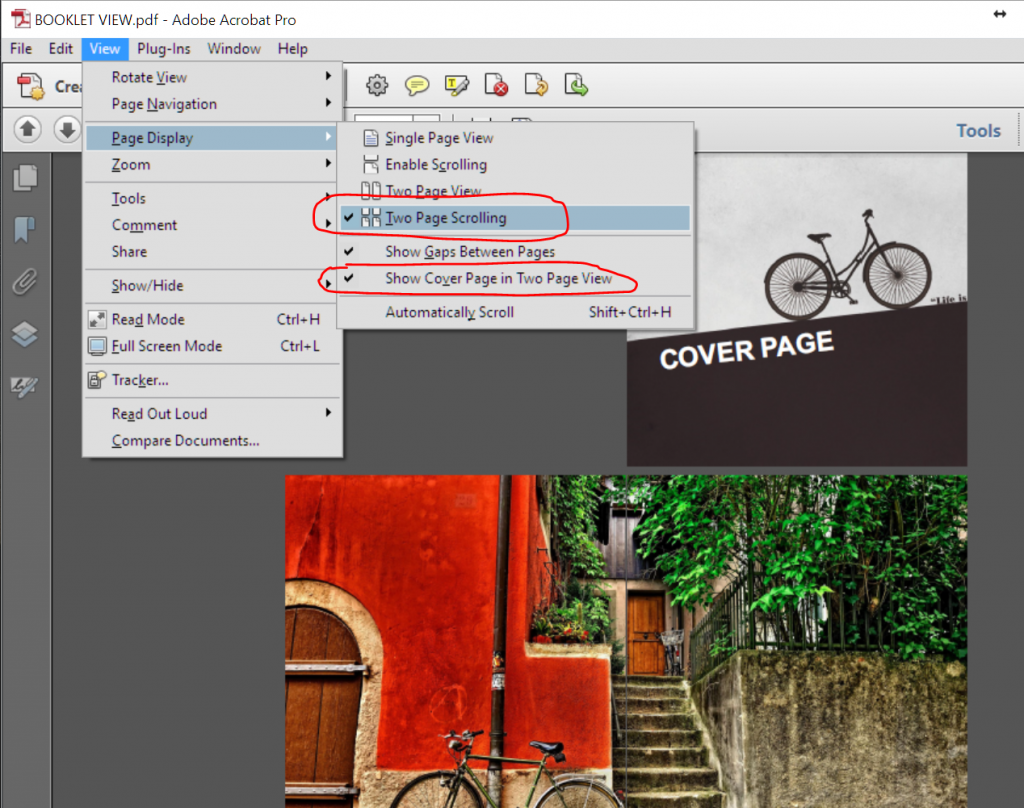
A left and right side page, when viewed together, is referred to as a spread. If you are using an image across an entire spread, be sure it is in the right place in your document. A left hand page will always be an EVEN number in your PDF document and a right hand page will always be an ODD number page. In PDF you can click 2 settings ON and this will allow you to view your PDF as I will look as a printed product. You can then scroll through to see if your spreads are in the correct place.
- VIEW/PAGE DISPLAY/2 PAGE SCROLLING
- VIEW/PAGEDISPLAY/SHOW COVER PAGE IN 2 PAGE VIEW
Try to not have text, lines, or faces on photos go over the middle of a spread. Printing has a margin of error like everything else and therefore can sometimes be 1-2mm off. Text going through a spread will show these tolerances more than the background of an image.
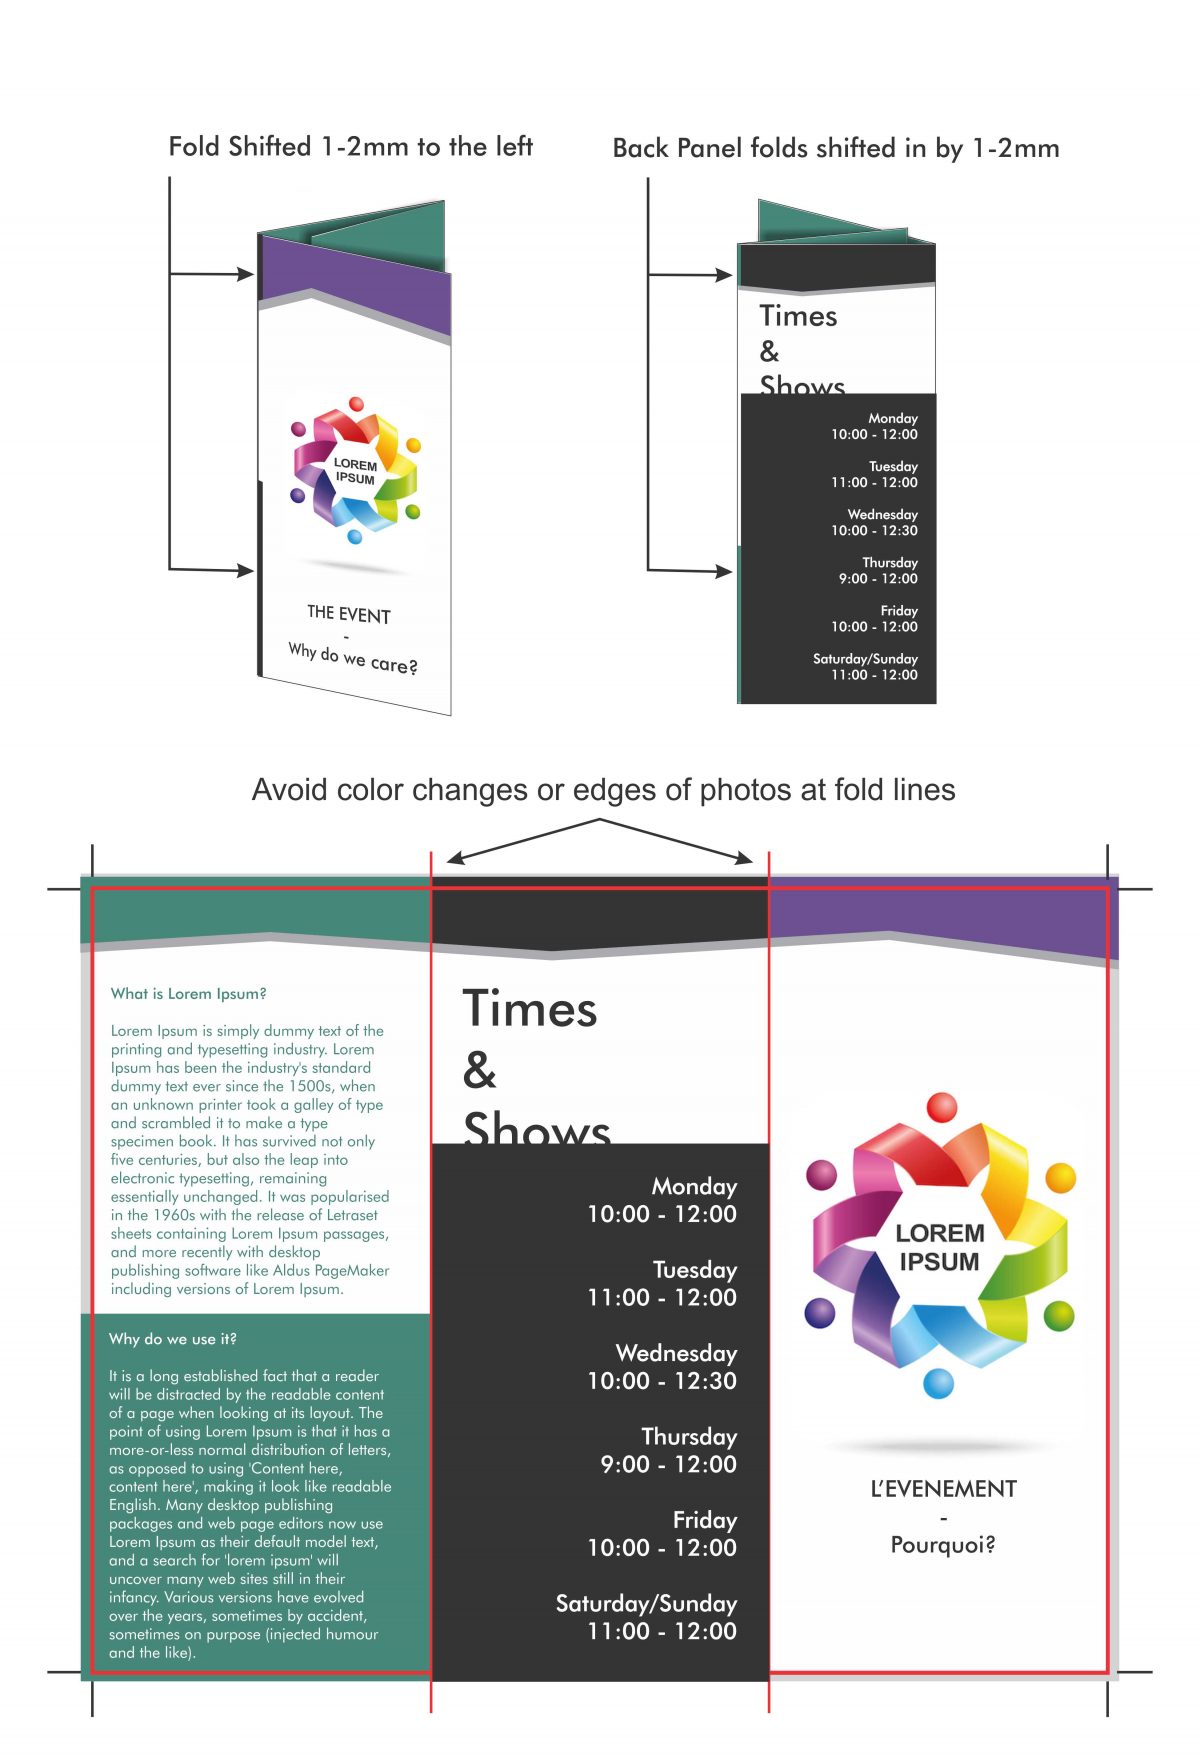
When Designing folded brochures, it is important to understand what type of brochure you are designing for and then based on the type, understanding the measurements associated with it. Often folded brochure files lack the necessary setup to get a great product!
There are MANY different types of folds, and each of them has there challenges, but the 2 most common fold types are:
- Letter folded – A brochure that folds in on itself, also referred to as Standard fold and Envelope fold
- Z-folded – A brochure that folds like an accordion, also referred to as Accordion fold
Standard bleeds are needed (0.125″ on all sides for a total of 0.25″) and when setting up your file it is best to place guidelines where the folds will be. These lines will be very different based on the brochure type you choose.
*Templates are available on the product page for most items
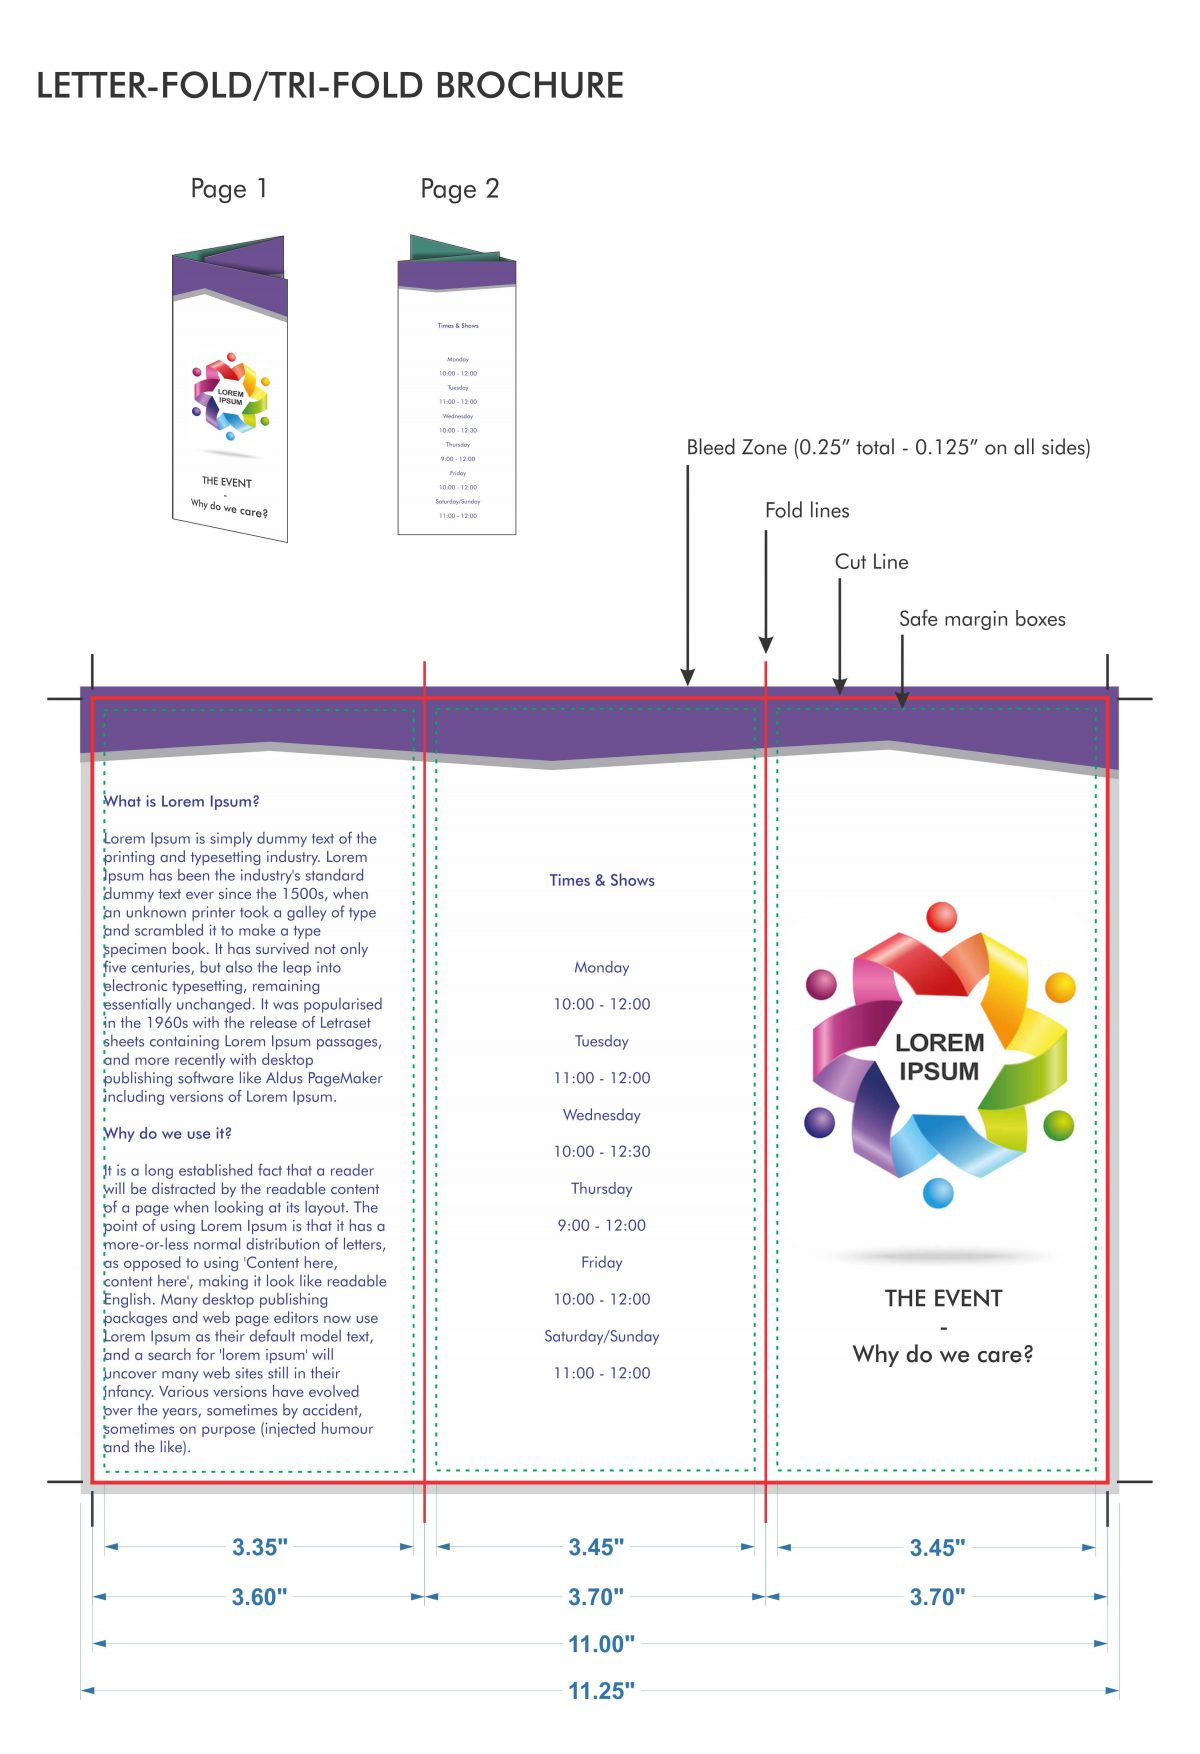
* Note the smaller left hand panel on letter folded brochures. This is needed to make sure it fits inside the brochure without getting wrinkled or bent. The tricky part is on the inside of the document the smaller panel will be on the right, so your 2 pages in your file need to be opposite of each other in term of panel sizes.
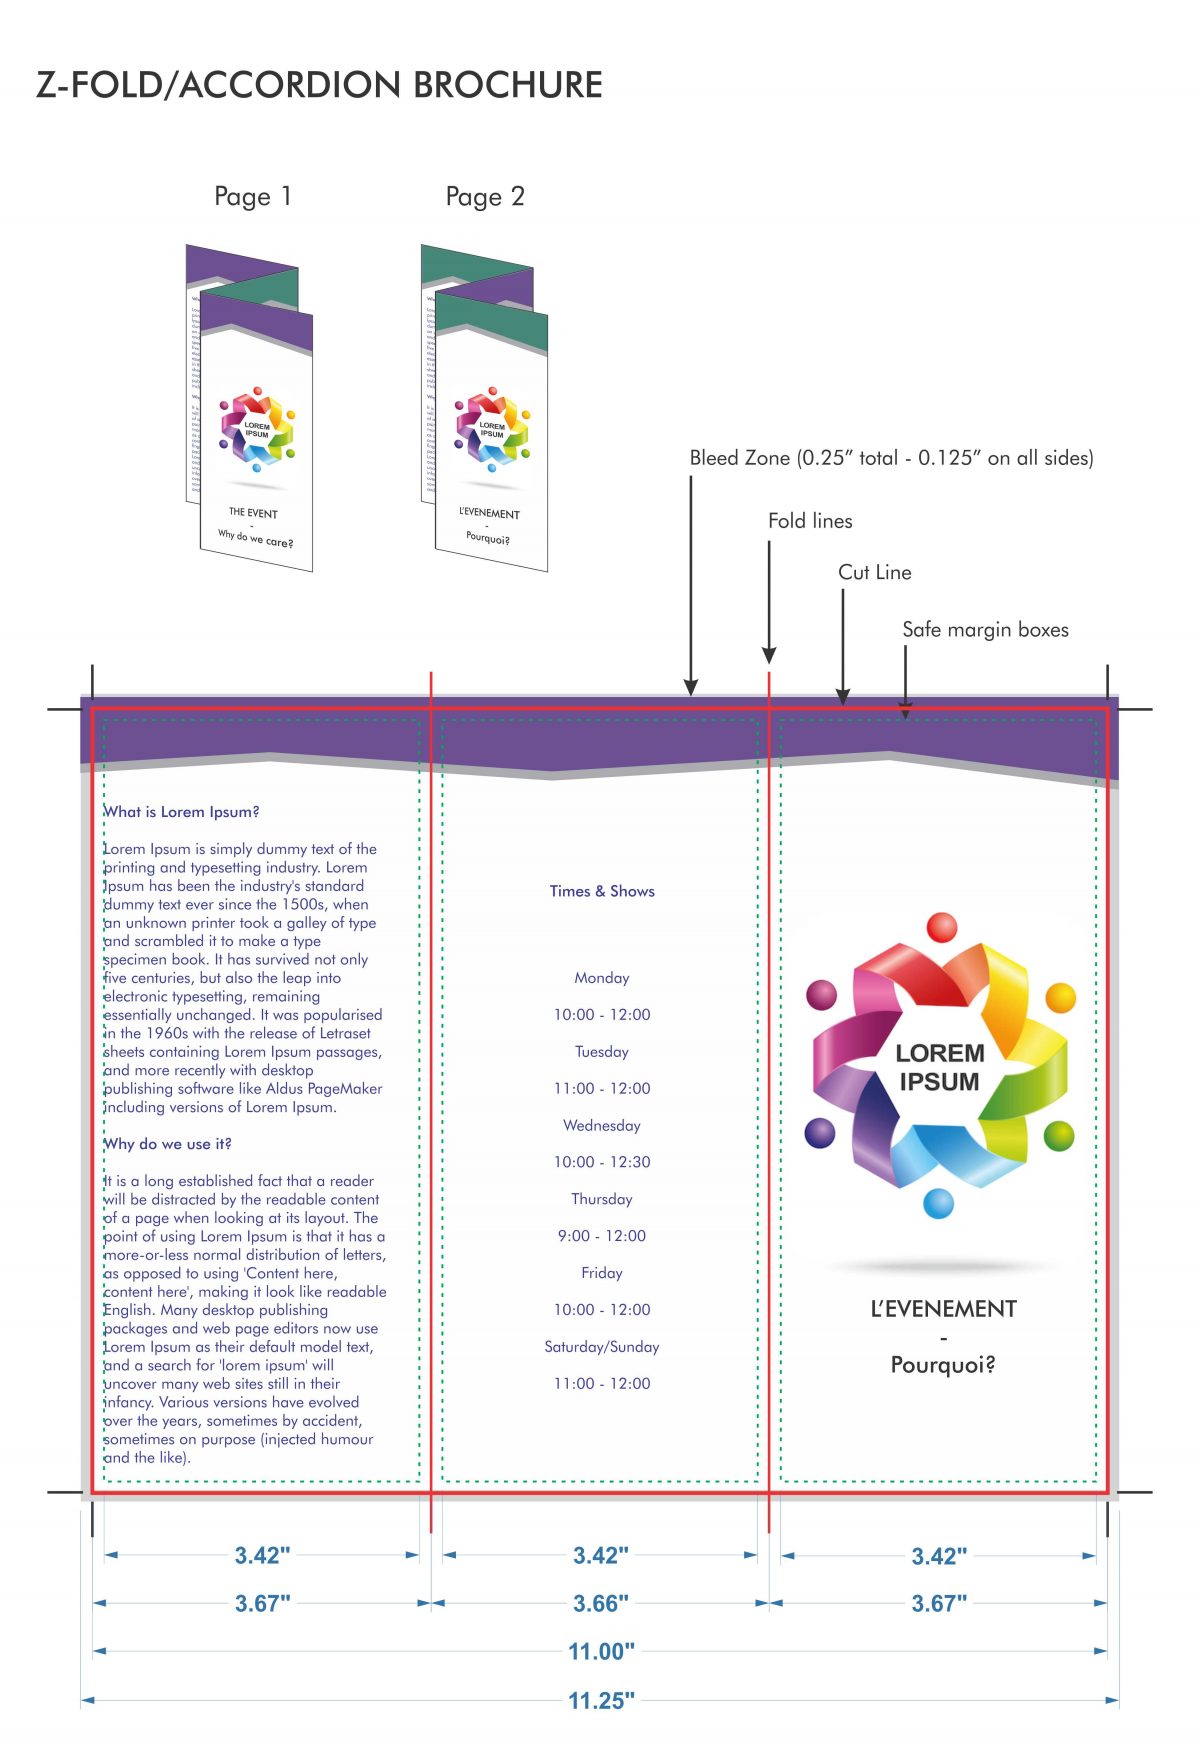
*The panels on a Z-fold (accordion) are all equal
When doing your design try to stay away from any colour change or edge of photos on your fold lines. All printing and folding equipment have a certain margin of error (102mm) So if 2 photos are lined up at a fold line, once folded a small amount of the image from the adjacent panel may be visible. This doesn’t end up being a very nice product, try and design around these issues.

Booklets are an aesthetically pleasing yet economical way to bind documents, but certain things need to be considered when designing and submitting your files. Make sure to always setup your files with bleeds and save in the appropriate PDF settings.
Let us help you through these three steps in order to get the best booklet possible
- Choosing your paper type
- Having the right number of pages in your document
- Properly setting up your spreads
1. Paper type
Booklets can be produced on all of our stocks and in almost any combination, but be aware that certain stocks, like silk and thick gloss can crack on the fold of the spine. We use a technique called scoring to reduce this appearance but on thicker booklets with silk covers, it is definitely better to choose an uncoated stock or thinner cover stock.
2. Page count
Booklets are multiple pieces of paper being folded in have and stapled together. When a sheet of paper is folded in half it now houses 4 readable pages. Your booklet must be a number divisible by 4 or blank sheets will have to be included.
For example: A 12-page booklet is perfect, and will use 3 sheets of paper, whereas a 10-page booklet cannot fit on 2 sheets pf paper (8 readable pages) but would still have to go on 3 sheets of paper but have 2 blank pages somewhere. You might as well add 2 more pages of graphics or images to fill up your blanks.
Booklets can be a maximum of 100 readable pages and only if all pages are on the thinnest paper, including your covers! To make sure your paper choice can fit the amount of pages be sure to ask us for:
- 100 pages on regular enviro
- 80 pages on silk and gloss thin stock
- 64 pages on 140m matte stock
These numbers will be less when applying a cardstock cover
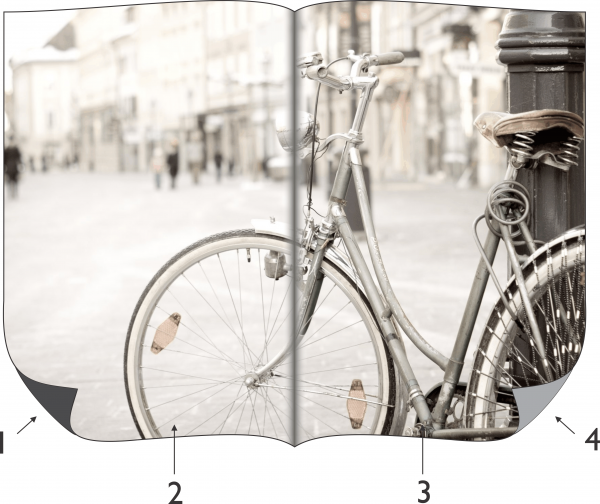
Spreads
A left and right side page, when viewed together, is referred to as a spread. If you are using an image across an entire spread, be sure it is in the right place in your document. A left hand page will always be an even number in your PDF document and a right hand page will always be an odd number page. In PDF you can click 2 settings on and this will allow you to view your PDF as I will look as a printed product. You can then scroll through to see if your spreads are in the correct place.
- VIEW/PAGE DISPLAY/2 PAGE SCROLLING
- VIEW/PAGEDISPLAY/SHOW COVER PAGE IN 2 PAGE VIEW

Try to not have text, lines, or faces on photos go over the middle of a spread. Printing has a margin of error like everything else and therefore can sometimes be 1-2mm off. Text going through a spread will show these tolerances more than the background of an image.
- CMYK is the standard colour setting for printed materials, offset or digital. It has a smaller gamut than RGB and printed products obviously do not have a light source but only a white background from the piece of paper. Because of this smaller gamut it is strongly advised to convert your images and have all yours colours done in CMYK before sending files in to be printed. You might notice some images get more pale when converted to CMYK, and this is an example of the smaller spectrum of colour, so playing with your colours after converting is advised, until you get a result that you like.
- RGB is a colour setting which uses RED, GREEN and BLUE and is used on monitors because it has a white light source behind it
- PANTONE is a specific colour, as opposed to a gamut of colour like CMYK and RGB. This type of colour setting is usually kept for specific colour matching of corporate logos and large volume jobs. It is not used in standard print documents and does not have anything to do with photos or images. If using a PANTONE colour in a document, it is important to indicate this before printing, as standard digital and offset presses are only equipped with CMYK colours.
Do Not Trust The Colours On Your Screen
When producing print ready files one must remain realistic about the differences between print and your monitor. Unless your monitor is professionally calibrated with expensive tools and software, your monitor is only going to give you a vague idea of the colours of the final printed piece
Is converting images to CMYK important?
Yes! It’s very important if you are working on a print document. Commercial printers mostly accept RGB images without question but using images with a RBG colour space can seriously change the outcome of your image. Most printers who accept RBG images, auto-convert them to CMYK without checking the outcome.
Make sure you convert images to CMYK yourself, so you can do adjustments on the CMYK outcome if needed and keep 100% control over image quality.
Converting to CMYK
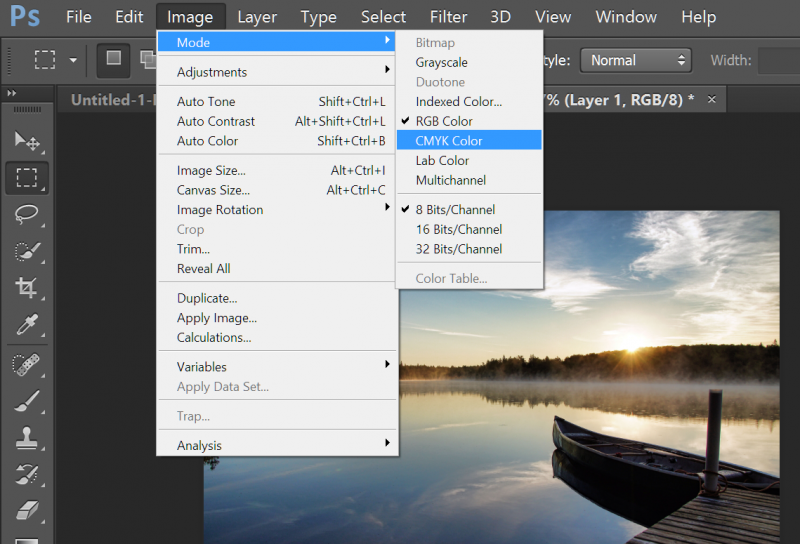
At certain points during your work (or play) you will have to convert images from RGB to the CMYK colour space (as discussed above). Any respectable image editor or file layout program has an option for it. Sometimes it can be tricky to find the specific option to convert to CMYK.
Here is a list of several common programs with instructions on how to convert the colour space to CMYK.
- Adobe PhotoshopIf the file already exists, select the following menu options: Image > Mode > CMYK When starting a new file select CMYK for the mode before clicking OK.
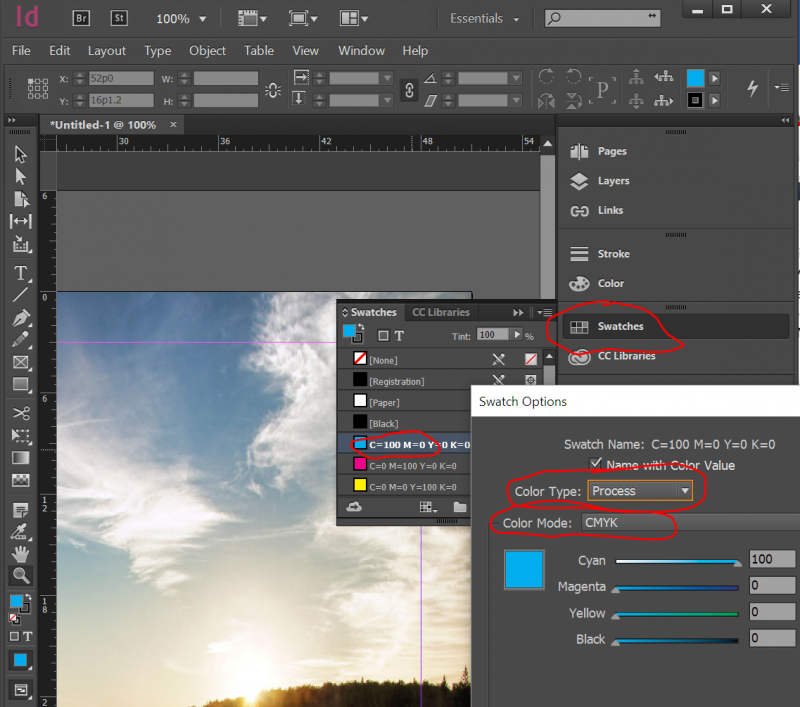
- Adobe InDesignUse the following menu options: Window > Swatches and Window > Color. Double click colour in Swatches Change color mode to CMYK and colour type to Process. Any colours created in the document that are not in the Swatches palette, need to be changed to the CMYK colour space. Select each object you want to convert and make sure the colour palette reflects the CMYK percentages. Click top right arrow in the palette to change to CMYK if necessary.
- Adobe IllustratorUse the following menu options. For an existing file select Edit > Select All and then Filter > Colors > Convert to CMYK. For a new file, select File > New and select CMYK colour for the Color Mode.
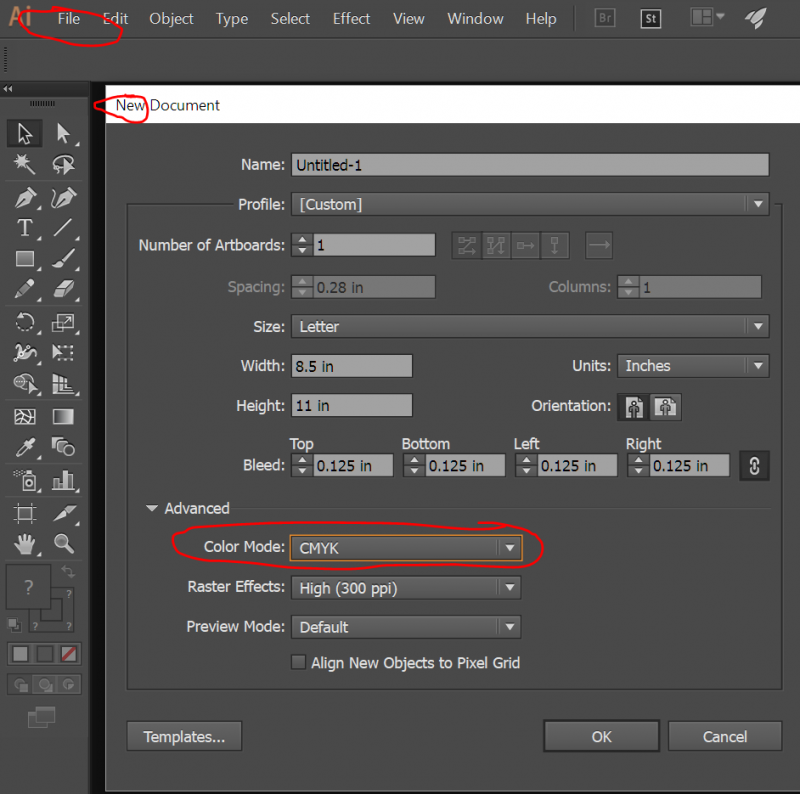
- Corel DrawSelect each object you want to convert. Select the Fill tool and click Fill Color Dialog. Make sure the Color model is CMYK. For each object with an outline: Select the Outline tool and click the Outline Color Dialog. Make sure the Color model is CMYK.
- Quark XpressUse the following menu options: Edit > Edit Colors > Show Colors in Use > Highlight Color and click Edit. Change model to CMYK and deselect Spot color.
- Adobe PagemakerUse the following menu options: Window > Show Colors. Double click “colors” in palette and select Model to be CMYK and Type to be Process. Please be advised that Pagemaker does not successfully represent CMYK color on the monitor.
“Bleed” is a printing term that is used to describe a document which has images or elements that go to the edge of the page. All printed items that have images or colours going off the edge of the page have been printed on larger sheets and have been cut down. The reason bleeds exist is due to the margins of errors in printing and cutting. Between a print and a cut there is always the possibility of a 1-2mm variance and bleeds help to make sure that your printed items do not end up with white lines or cut off text around the edges.
The three important things to understand are:
- Bleed zone – the area that goes outside of the final size of your document and contains your background images and colours
- Cut/Crop zone – the area where your final product will actually be cut, removing anything that goes beyond it into the bleed zone
- Text safe zone – the area within your crop zone that ensures your writing does not end up too close to an edge and risk being cut off
The example below shows how a document should be set up with bleed. This is the way you must set up your document if you intend to have graphics that extend all the way to the edges of the cut item.
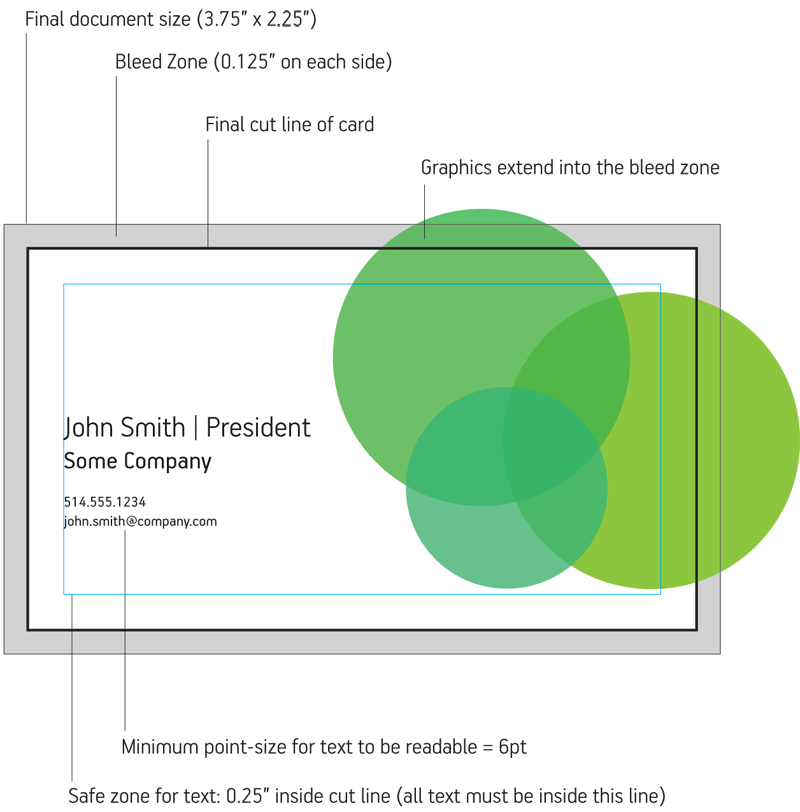
Common Document Sizes & Their Measurements With Bleed:
- 3.5” x 2″ business card —> 3.75” x 2.25”
- 4” x 6” postcard —> 4.25” x 6.25”
- 5” x 7” invitation —> 5.25” x 7.25”
- 8.5” x 11” sheet —> 8.75” x 11.25”
- 11” x 17” sheet —> 11.25” x 17.25”
- 12” x 18” sheet —> 12.25” x 18.25”
The exception to the rule is large format posters.
Products being produced on large format machinery (anything over 13” x 19”) do not require bleed.
Handy Tip:
Rubiks works mostly with the Standard System of inches. If you work with the Metric System of centimetres, here is a how to convert your measurements to inches.
centimetres ÷ 2.54 = inches
and vice versa:
inches x 2.54 = centimetres
By default we use high end digital presses, which are toner based laser printing machines. For larger jobs and longer runs, we use our affiliates offset presses, equipped with Vegetable based inks.
Our onsite printing equipment:
- Minolta 1060 Digital press
- Minolta 1070 Digital press
- Minolta 1060l Digital printer
- Minolta 6000 Digital printer
- Primera CX1200 Label printer
- Skycolor 63″ Eco solvent Large format printer
- Canon IPF 8400 44″ Large format photo printer
- Canon IPF 8300 44″ Large format Photo printer
- Wute 2500UVF 4′ x 8′ flatbed printer
Onsite Finishing equipment:
- Eurocut 28″ Hydraulic guillotine
- Digicut 20″ Guillotine
- Plockmatic BM2000 offline bookletmaking machine
- Bourg 3001 Perfect binder
- Sterling Digibind perfect binder
- 60″ Large format Mounting machine
- Primera FX1200 label diecutter
- GBC ultrapunch automatic punching machine
- Morgana 33 autocreaser scoring machine
- Qtopic automatic laminating machine
- MBM Folding machine
- Binding equipment
- Corner rounding equipment
- Hole drilling equipment
- Letter Inserting equipment
- Padding equipment
With a full range of printing and finishing equipment, we are ready to get most of your printing needs completed in a fast turnaround.
We carry a large range of pre-cut stickers sheets, all in matte and glossy finish for those who require this over die-cut sticker rolls.
Circle Sizes
- 0.75″
- 1″
- 1.5″
- 2″
- 2.5″
- 3″
- 3.5″
- 4″
Oval Sizes
- 3″ x 2″
- 2.25″ x 1″
With our die-cutting label machine, we can print stickers in almost any shape you can think of. The unused portion of the sticker roll is removed, making it very easy to remove. The smallest size is approximately 1″ x 1″ depending on the complexity of the die-cut.
Finishes
- Matte
- Gloss
- Gloss Laminated
We carry adhesive paper, perfect for making almost any size stickers between 1″ x 1″ and 12″ x 18″ (square/rectangle cut only, no die-cutting on individual stickers available)
Finishes
- Matte
- Gloss
- Frosted/Clear (Custom only)
Need a quote for your project?
Receive a quick quote based on your specific project requirements.