Perfect book binding is a glue binding that looks just like a soft cover book. One needs to think a little differently when creating a book, and some things that might not seem so obvious can cause big problems when it comes to a finished piece.
Let us help you through these three steps to accomplishing a good looking book (content aside)!
- Choosing the paper
- Setting up the cover and spine
- Setting up the interior pages
1. Choosing Your Paper
Rubiks can perfect bind books with many types of paper and even card stock, however, it is important to note that there is a minimum amounts of sheets that are needed to produce a book, otherwise the glue will not hold and the book will fall apart. The minimum amount of sheets depends on the thickness (or weight) of the paper type.
Minimums for our most common paper types:
- 20lb Enviro (our thinnest paper) = minimum of 25 sheets
- 140m Lynx Laser Paper (thicker, standard matte book paper)= 20 sheets
We can bind books with coated paper interiors (gloss, etc.) but this does decrease the solidity of the book. We cannot be held responsible for pages that come loose on books with coated interiors.
2. Setting Up Your Cover
Rubiks will charge an extra fee (minimum 25$) for setting up the cover of your book, so it’s good to learn how to do it properly yourself. There are certain steps to take and certain ways to setup your document.
We also strongly recommend taking your covers with matte lamination, as this provides a good protection against scratches, fingerprints and tearing for your cover
Requirements:
- Your cover must be a separate file (document) from the rest of your book. A high resolution pdf is preferred.
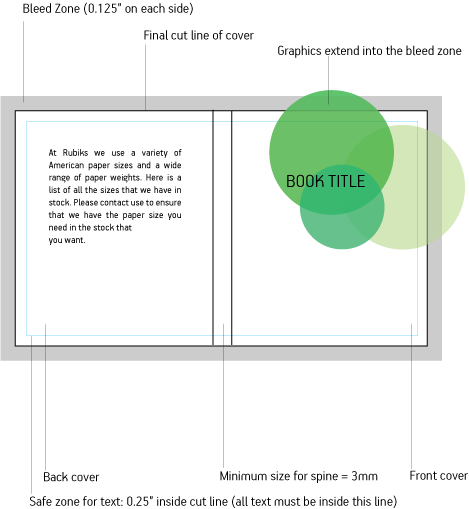
- You must include the back cover, spine and front cover as one image in your document (see diagram below)
- You must add bleed to your cover (0.125″ on each side) See our Bleed Guidelines (link) if you need help with bleeds.
- It is strongly advised that your spine be of the same background colours as you front and back covers. When creating a spine that is a different colour, then the print shift tolerance of +/- 2mm can be noticed much easier.

Steps to Take:
- Choose the paper type for the inside pages of your booklet when requesting your quote
- Verify the spine thickness number indicated in the quote you receive.
- Add this measurement to the widths of your front and back cover.(For example, if your book is 8.5″ x 11″ and your spine width is 0.25″ thick you would add 8.5+8.5+0.25 to get a total width of 17.25″. You now know that your total cover size is 17.25″ x 11″
- Add 0.125″ bleed to each side of the total cover size to get your document size(For example if your cover is 17.25″ x 11″, with bleed it should be 17.5″ x 11.25″)
- Create a new document in the program of your choice with this size
- Paste in or create the graphics for your back cover, spine and front cover, making sure to let the background colors and graphics extend to the edge of the document. Also make sure to keep your text within the safe zone. (See diagram)
- Save your document as a .pdf (see ‘Saving files for printing’) link***
- Repeat the above steps for the inside of your cover if you require printing on the inside cover. Please note, this is not advised, and very rare do books actually have printing on the side of their front and back covers. They are more often than not just blank
3. Setting Up the Interior Pages
First, make sure the file for your interior pages should starts as the first page of the reading section, NOT including any of the cover pages (interior or exterior)
Note the first page will be on the front of a sheet. Page numbers that fall on the front of a sheet are always ODD numbers and backs of the pages are always EVEN numbers. (page 1 is a front, 2 is a back, which would be on the left side next to page three, which is on the right). When you open a book, and view both the left and right side as one page, this is referred to as a spread. Spreads must be comprised of an EVEN (left and ODD (right) page. For example, if you had a photo that took 2 pages and those 2 pages were page 7 and 8 in your PDF document, this spread would not work as it would land on a front and back of the same page.
Include a gutter margin
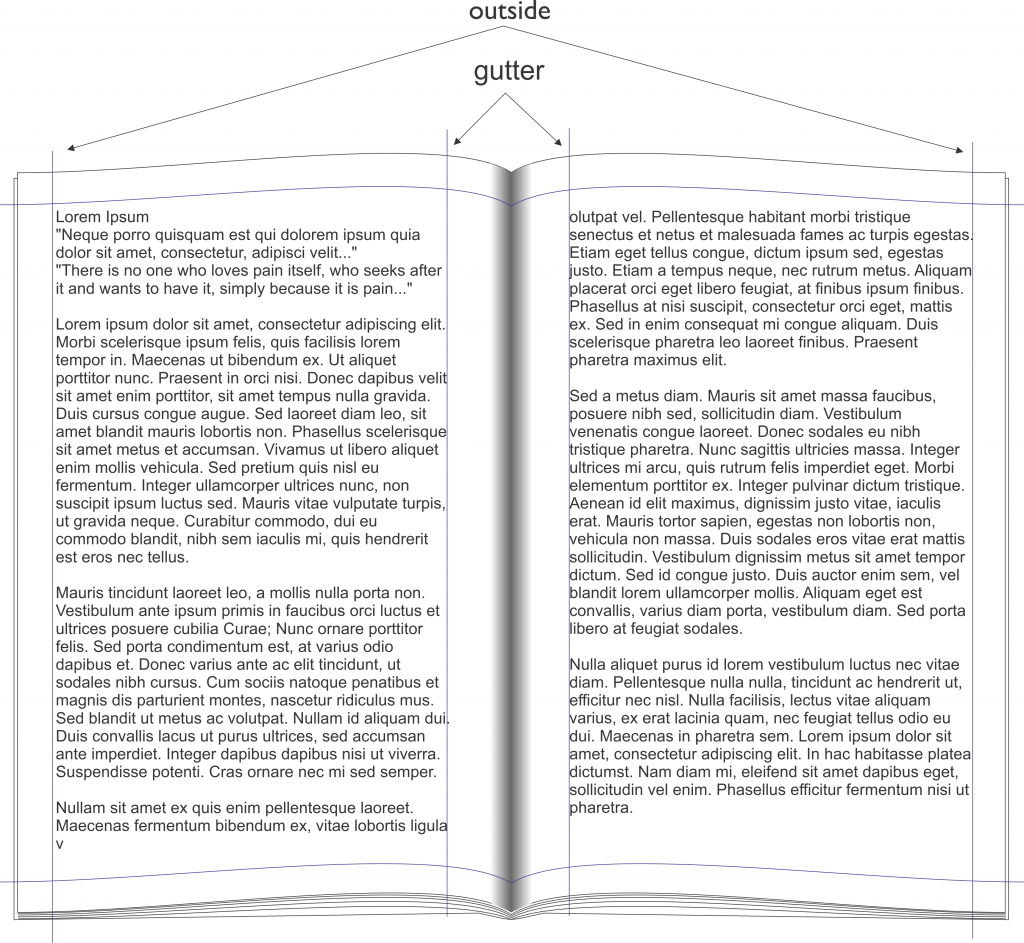
When you hold a book open, the area where the book is glued together in the center is referred to as the gutter. You do not want any text to be too close to this area as it will be hard to read and force the reader to put unnecessary pressure on the spine by holding it open too wide.
For 6” x 9” book or smaller:
- 0.5” for top, bottom and outside margins
- 0.75” for gutter margins
For 8” x 10” or larger:
- 0.75” for top, bottom and outside margins
- 1” for gutter margins

Make sure your page numbers are on the outside
If adding page numbers be sure to put them on the outsides of pages. For example, ODD pages would have numbers on the far right, and EVEN pages would have them on the far left.
Make sure colour pages are in colour mode and black pages are in black mode
Pages that have colour on them need to be saved in CMYK and black or text only pages should be saved in just K (black of CMYK) This will reduce your costs by allowing us to print non colour pages in black only.
Make spreads look good
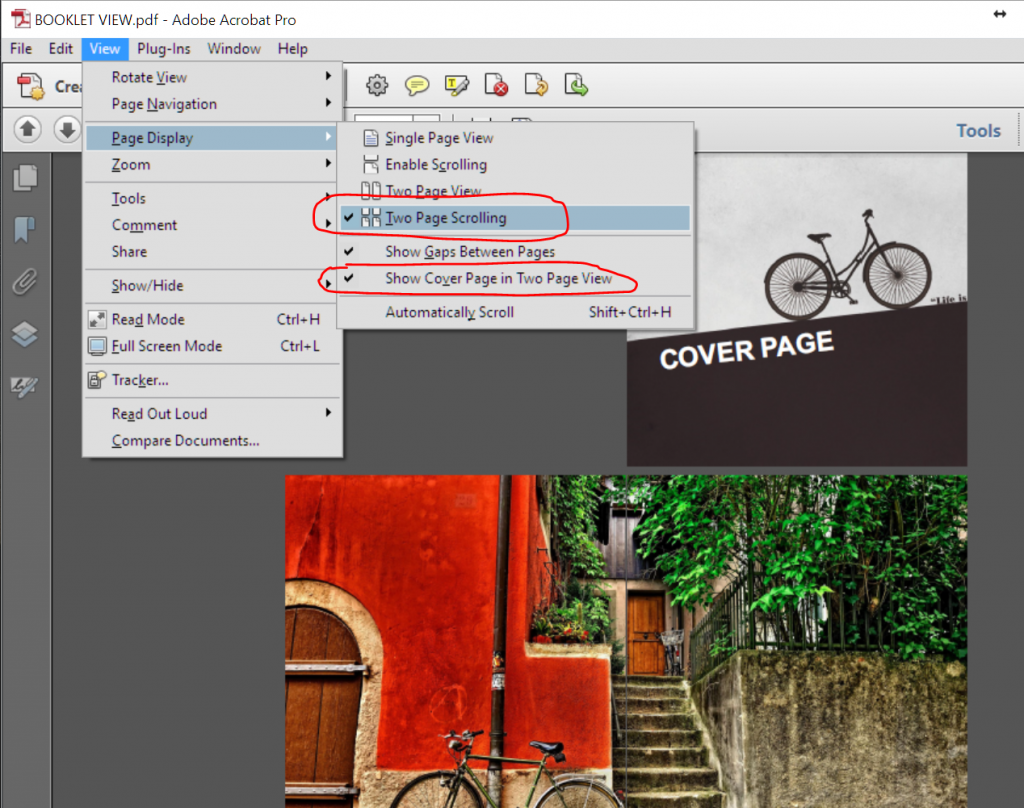
A left and right side page, when viewed together, is referred to as a spread. If you are using an image across an entire spread, be sure it is in the right place in your document. A left hand page will always be an EVEN number in your PDF document and a right hand page will always be an ODD number page. In PDF you can click 2 settings ON and this will allow you to view your PDF as I will look as a printed product. You can then scroll through to see if your spreads are in the correct place.
- VIEW/PAGE DISPLAY/2 PAGE SCROLLING
- VIEW/PAGEDISPLAY/SHOW COVER PAGE IN 2 PAGE VIEW

Try to not have text, lines, or faces on photos go over the middle of a spread. Printing has a margin of error like everything else and therefore can sometimes be 1-2mm off. Text going through a spread will show these tolerances more than the background of an image.
