“Bleed” is a printing term that is used to describe a document which has images or elements that go to the edge of the page. All printed items that have images or colours going off the edge of the page have been printed on larger sheets and have been cut down. The reason bleeds exist is due to the margins of errors in printing and cutting. Between a print and a cut there is always the possibility of a 1-2mm variance and bleeds help to make sure that your printed items do not end up with white lines or cut off text around the edges.
The three important things to understand are:
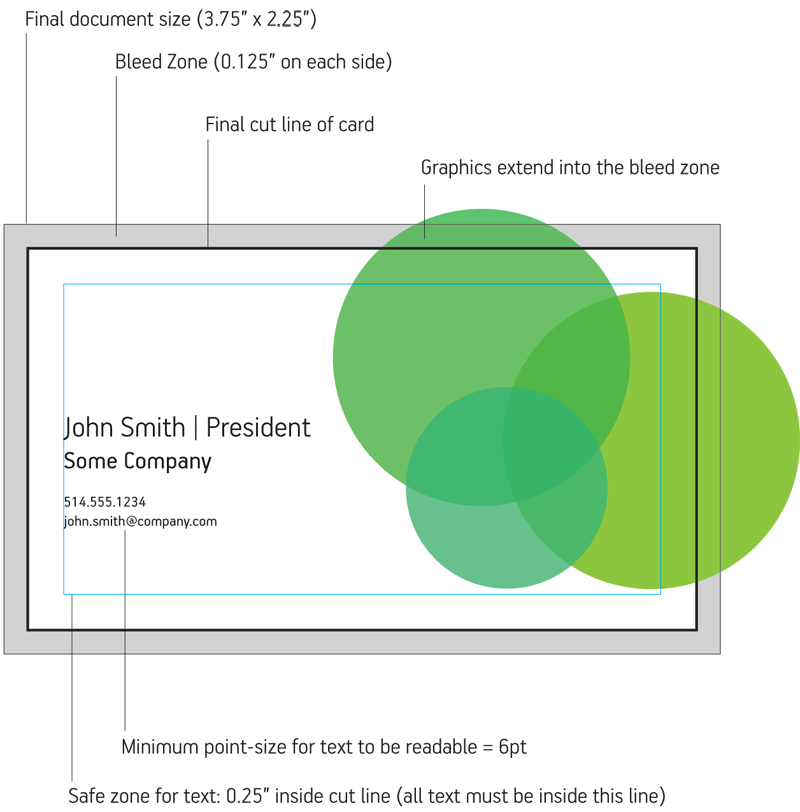
- Bleed zone – the area that goes outside of the final size of your document and contains your background images and colours
- Cut/Crop zone – the area where your final product will actually be cut, removing anything that goes beyond it into the bleed zone
- Text safe zone – the area within your crop zone that ensures your writing does not end up too close to an edge and risk being cut off
The example below shows how a document should be set up with bleed. This is the way you must set up your document if you intend to have graphics that extend all the way to the edges of the cut item.
Common Document Sizes & Their Measurements With Bleed:
- 3.5” x 2″ business card —> 3.75” x 2.25”
- 4” x 6” postcard —> 4.25” x 6.25”
- 5” x 7” invitation —> 5.25” x 7.25”
- 8.5” x 11” sheet —> 8.75” x 11.25”
- 11” x 17” sheet —> 11.25” x 17.25”
- 12” x 18” sheet —> 12.25” x 18.25”
The exception to the rule is large format posters.
Products being produced on large format machinery (anything over 13” x 19”) do not require bleed.
Handy Tip:
Rubiks works mostly with the Standard System of inches. If you work with the Metric System of centimetres, here is a how to convert your measurements to inches.
centimetres ÷ 2.54 = inches
and vice versa:
inches x 2.54 = centimetres